Requirements
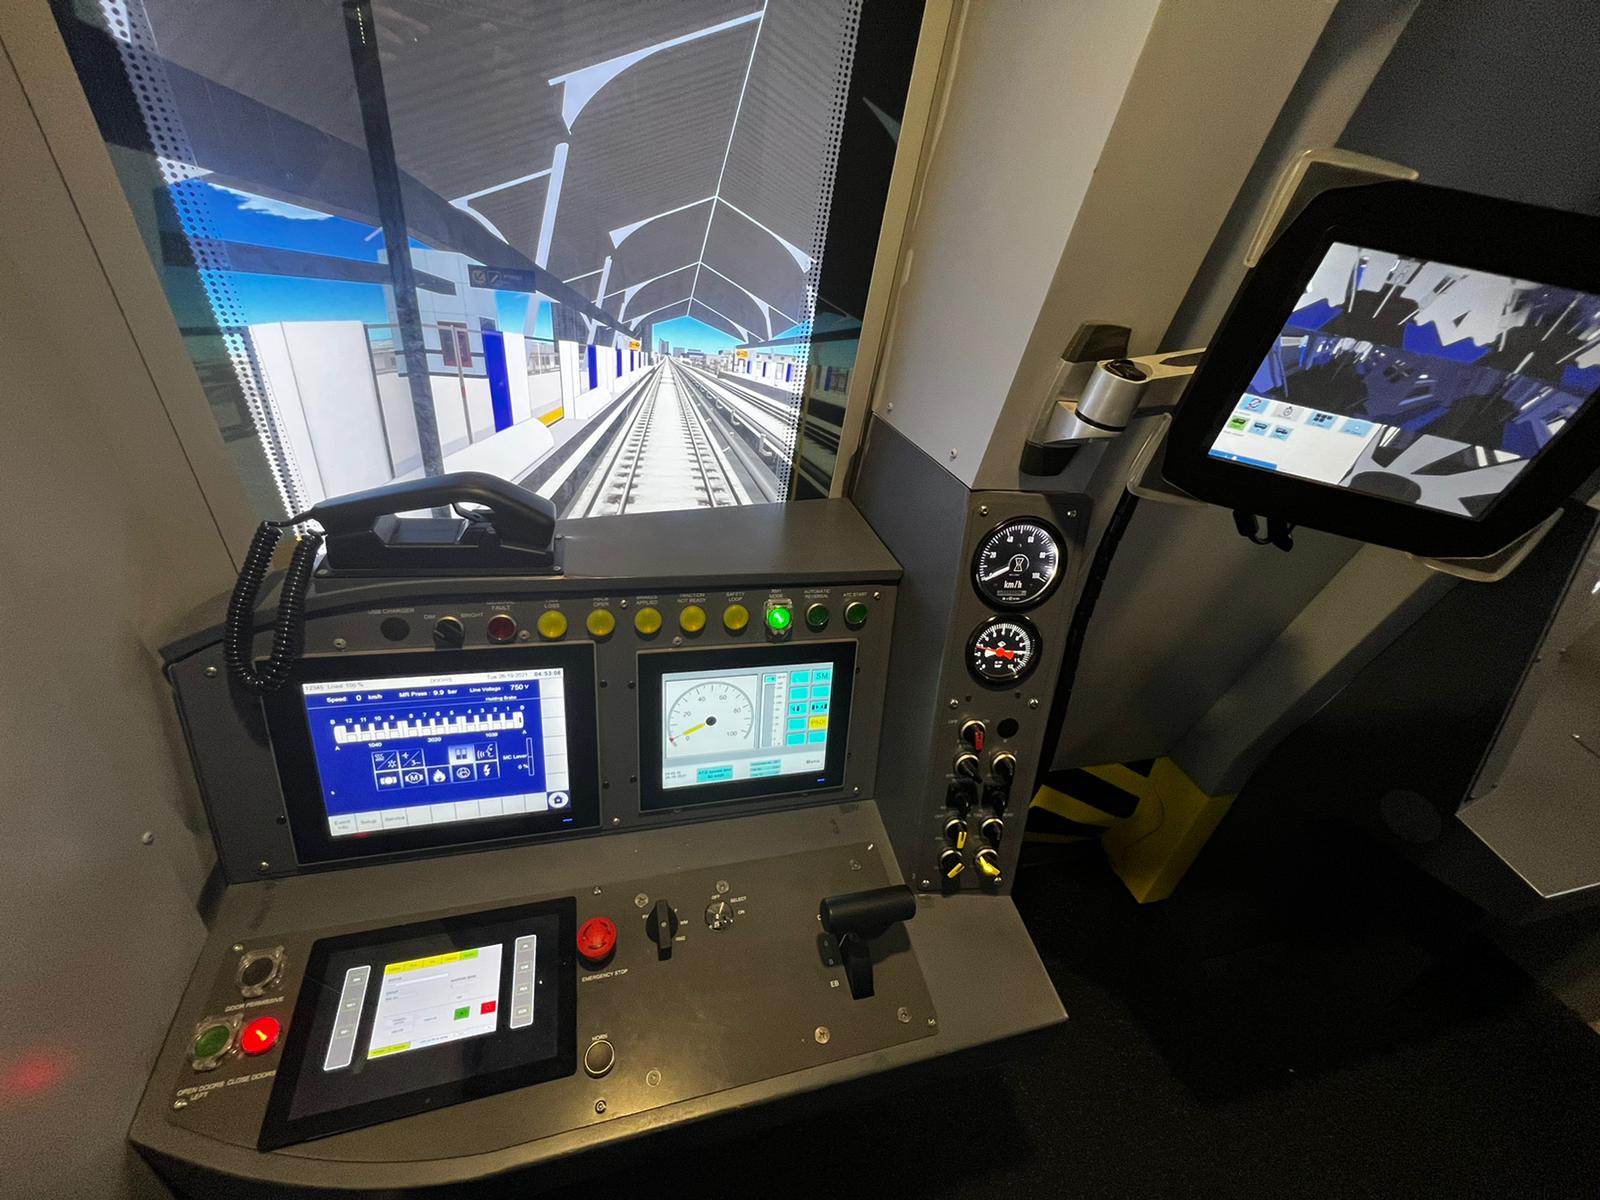
Development of a software to support a metro cabin simulator for training operations on a new Bangkok MRT blue line, including depots procedures. The cabin shall be a replicate of the original driver seat. The outside view shall be using a dome screen with projection of realistic synthetic 3D models. Inside the driver cabin, some CCTV monitors shall show inside any selected train cabin from various angles. Digital side mirrors shall show the quay and the stopping mark. Passengers with realistic behaviors shall also be simulated.
The project has been carried out by WM Simulator co., ltd. located in Bangkok Thailand. VirtualSim has supported the team effort under remote consulting using vsTASKER and vsVIEWER graphic engine.
The mandatory functionalities are below:
- Normal servicing on both lines with stop on each station;
- Passengers in and out, including fail doors;
- Route depot exercises;
- Failed train rescue exercise.
Architecture
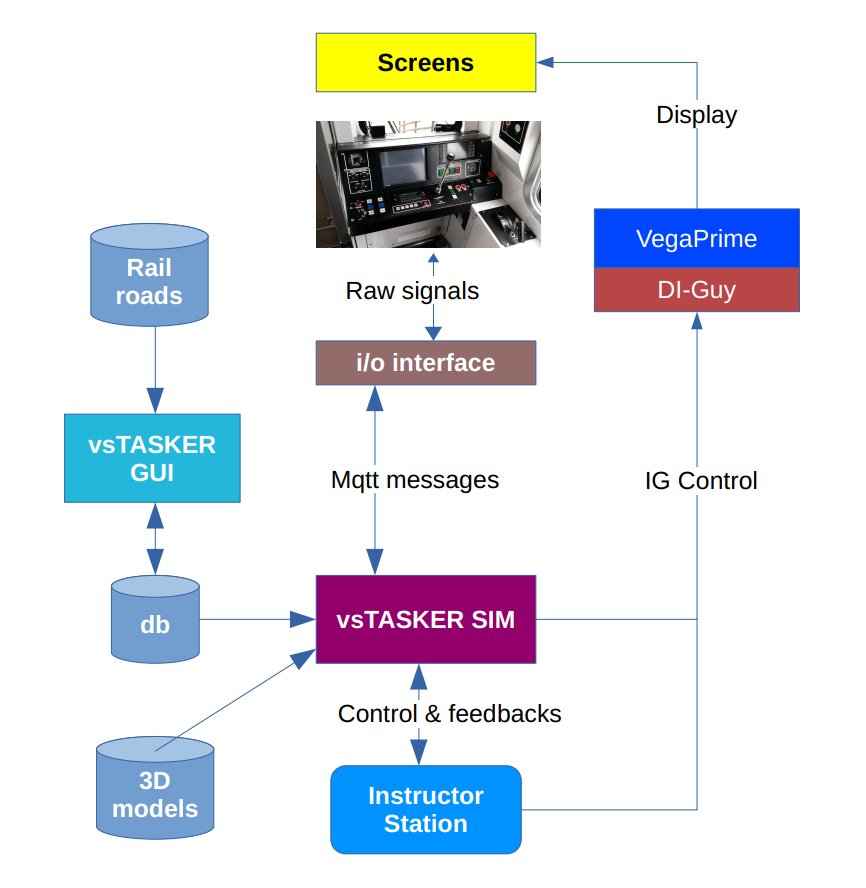
vsTASKER has been selected to handle the simulation core engine, named trainsim server. The distributed architecture around the server allowed parallelization of the development workload imposed by the tight schedule.
- Main core simulation engine generated by vsTASKER;
- MQTT message interface with cab device and train scheduler;
- VegaPrime for the 3D view on multiple channels and screens;
- DI-Guy for the passengers part.
Building the Railroad
vsTASKER needs to use a railroad to make the train follow the rails. For that, we use the built-in Road Feature to design manually the network over the imported terrain (OpenFlight format used by VegaPrime). The simulation engine only cares about the segment strip shapes and how to move the train along them. The terrain itself is of no concern except for altitudes.
Each junction is named to help the path finder to get a correct route to destination, in case different itinerary could be found (ie. find a route from A to B passing by junctions j1 and j2)
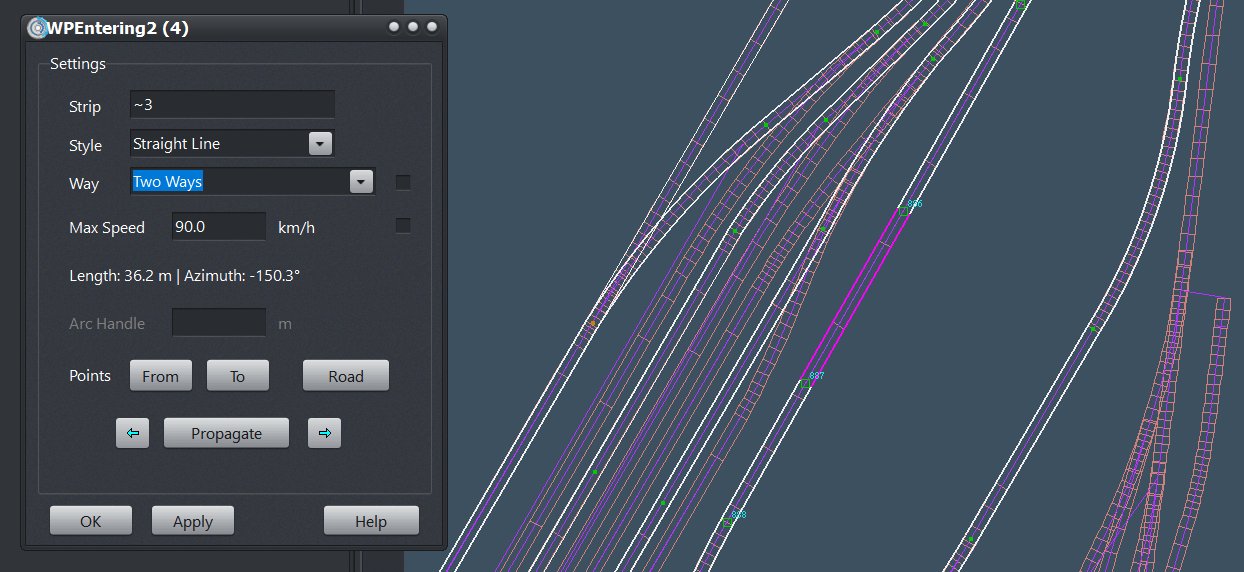
Apart from junctions and segment definitions (one way, both ways), spline and arc-circle segments needed to be used to perfectly match the rail shape. This work is done manually for the full railroad. An automatic process could be thought of for the next project. See the following video.
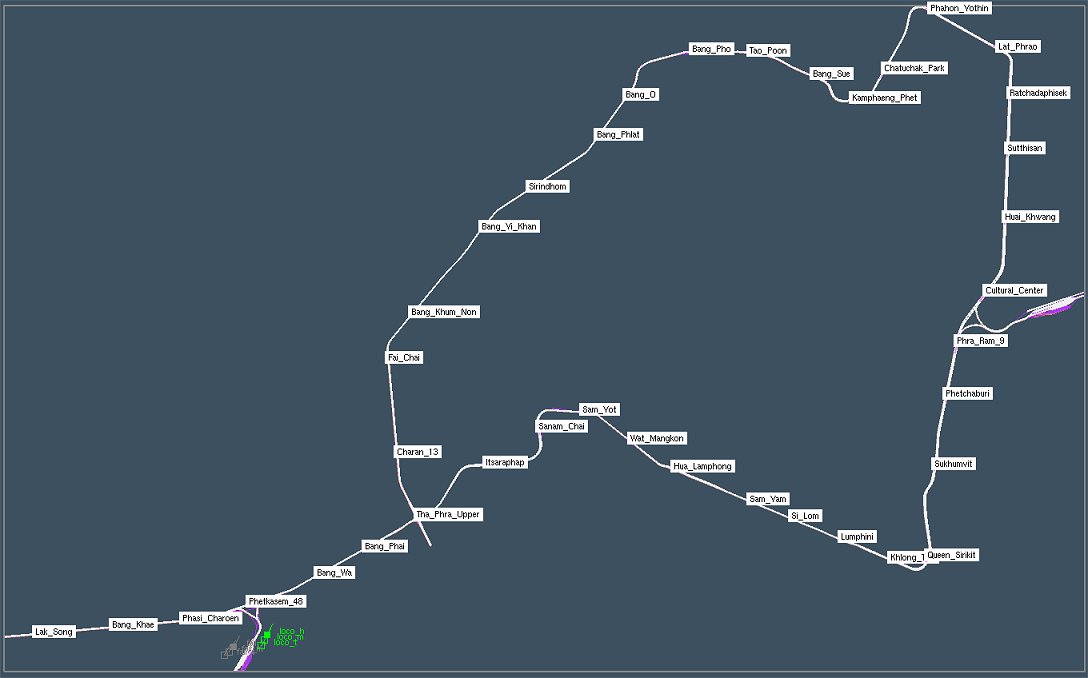
The description of the 48 km service lines required 920 segments, for a total length of 110 km including depots tracks.
Rail Dynamic Component
With a short vehicle like a car, moving the center of gravity and adjusting angles are enough to drive it along a road. A metro car is too long for such shortcut. Making a train car to follow realistically a rail supposes to move its front and rear axles along the rail. For a forward motion, the front axle is displaced of a given distance along the rail, according to the speed and time. Then, the rear axle has to move next to keep constant the straight distance to front axle. The train car frame is then adjusted according to both axles.
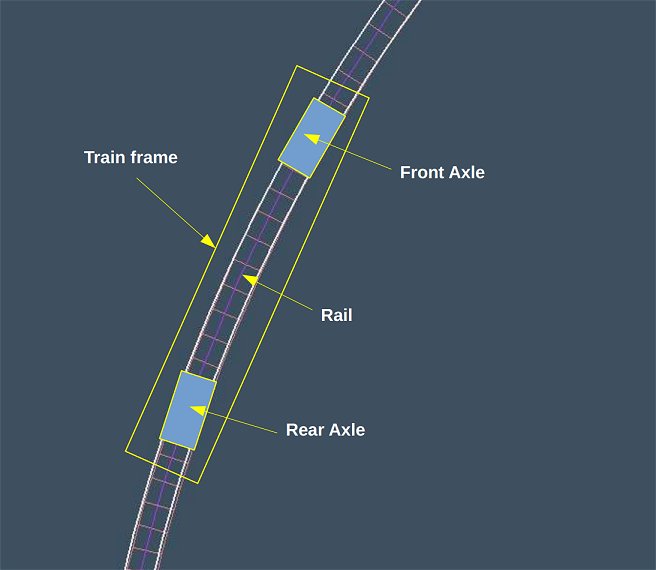
The train is made of one locomotive and several wagons hooked together. Each wagon’s dynamic is independent. Its orientation depends on the rail geometry beneath. Its position is computed every time step according to the head locomotive speed which is the same for all bodies. If the locomotive moves of 10 cm, all wagons move of 10 cm on their rail (we consider there are no shock absorber).
Placing the train on the rail supposes to position the axles accurately on the rail and repeat the process for each wagon, from the first to the last one. Every car therefore waits for the one it is hooked to, to be ready. Then, the RailDynamic component computes the car position according to the hooked one and the various parameters describing the vehicle physical characteristics. Once positioned, it sets its mode to ready and the process is repeated until the tail car is all set.

The component is capable of following a rail route in forward and reverse motion. The strip of segments extracted from the network is provided by the path finder. The component slides both axles along the segments for a given distance computed at every cycle according to the train speed.
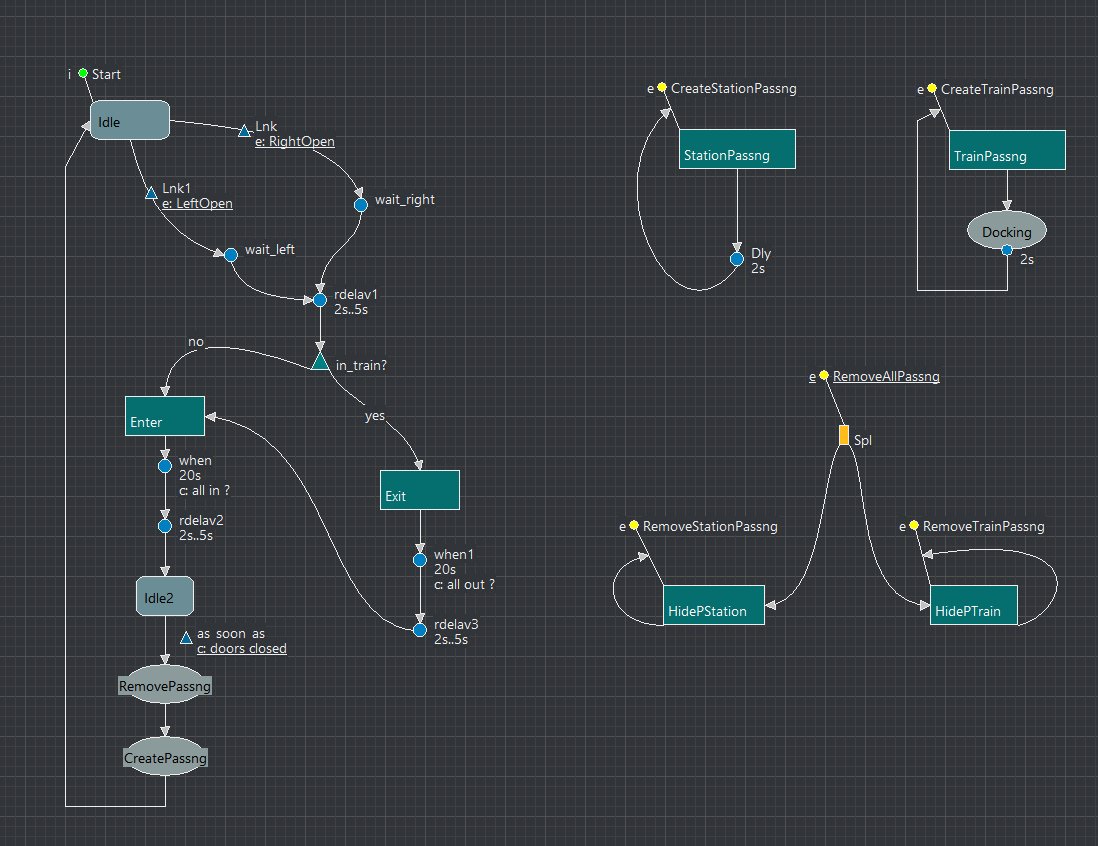
Scenario Logic
This logic reacts to the HMI mockup or the MQTT topics when connected to the real cab mockup. It does control the main train locomotive and the failed train.
The MQTT component attached to the scenario forwards data to the main locomotive or events to the scenario logic. It also broadcasts topics with train values and states on the network.
Locomotive Logic
The head locomotive (which remains the same even in reverse mode when only the driver’s camera is changed) listens to the scenario events and the HMI mockup inputs.

The logic covers the following tasks:
- Find a route from one station to one another;
- Follow a procedure to get in or out of a depot;
- Find the initial position on the route;
- Position the main locomotive axles on the rail;
- Hook the other wagons;
- Hook to the failed train (and drag/push it);
- Open and closing doors;
- Perform automatic driving with proper stop at mark.
Test Mockup
To test all train procedures offline, before integration of the software inside the real environment, an HMI test mockup is needed. vsTASKER has a built-in interface builder for such purpose, which embeds in the simulation engine, meaning the mockup can also be used after integration for maintenance on deployed system.
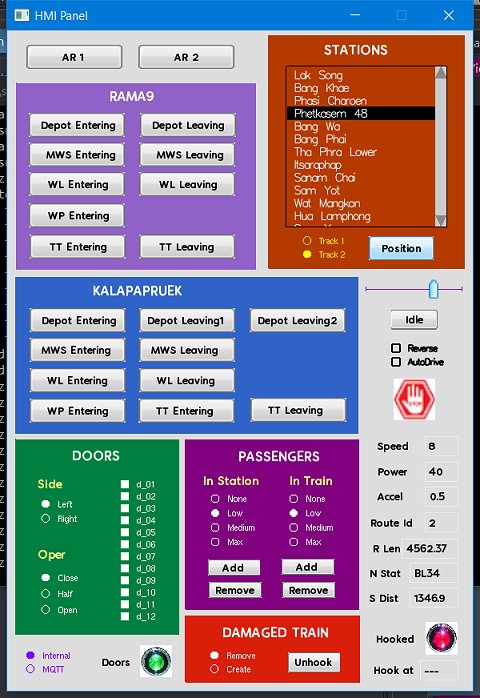
Using the mockup, depot routes and procedures can be tested individually. Service lines can be traveled from one specific station to terminal. Doors can be operated manually and failures set for any of them. Passengers density can also be adjusted for inside train and station quay. Damaged train can be added on the service line for the rescue procedure. Finally, a power handle, reverse button and emergency brake allow manual driving.
Multilevel Tracks
On some parts of the network, rail lines may be set on top of each others. This happens at stations or between two traffic lanes, when spacing is limited. Building rail network on a 2D map becomes difficult. vsTASKER solves this problem by clamping the segment on the lowest or highest altitude provided by the 3D terrain database (according to the user setting). The highest segments are defined first with the altitude mode set accordingly, then the lowest segments are defined next. Once done, all lines altitudes are locked.
Passengers Simulation
To increase the realism of the simulator, passengers must be represented inside the metro cars and on the quays. According to the habits of the Bangkok skyway, passengers waiting to board form too parallel lines on each side of the external doors. Exiting passengers move out between lines and when the car is empty, the waiting passengers board in sequence and fill the car. vsTASKER uses chained list to sequence characters and avoid chaos.
The instructor can specify the number of passengers in the train and waiting on the quay. The two values can be different even if not realistic. The boarding and emptying time can then be considered in the training, which impacts the schedule and the traveling speed.
Algorithms are first checked on a test plan, using DI-Guy from Mak Technologies to simplify the development, as their characters can be controlled with simple instructions (ie. walk, stand, run, turn…)
vsTASKER uses a proxy component which translates dynamic (turn, change speed, stop…) into DI-Guy instructions. A feedback loop makes sure the DI-Guy character is at the expected position vs the computed position (as the two models co-exist in the simulation, vsTASKER dynamic model being slave of the DI-Guy dynamic one). With this approach, checking the distance to a position or waiting for a correct orientation can be done using standard functions (distanceTo(), azimuthTo()…) The dynamic is simply externalized.
Once the passengers behave correctly on the test bench, algorithm are tuned on a real station, knowing that they are not alike and that escalator locations are different. Some stations are narrower than others and then, space between characters on the waiting lines have to automatically adjust.
Doors Component
To imitate the disembarkation and embarkation of passengers, doors must be actuated manually from the driver cabin.
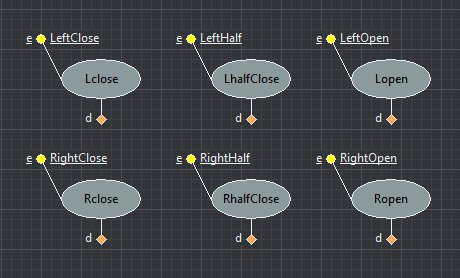
These actuation must handle the graphic counterpart (articulated parts on the 3D model) as well as triggering behaviors at the passenger level.
Also, some doors could take more time to open or close. Driver could also decide to half close them. Some may be blocked, forcing passengers to choose a closest one.
Depot Routes
Special names procedures must be provided to the training system. Instructor may initiate any depot exercise, like going to a specific parking rack from a given station, or driving to the wash station then park again.
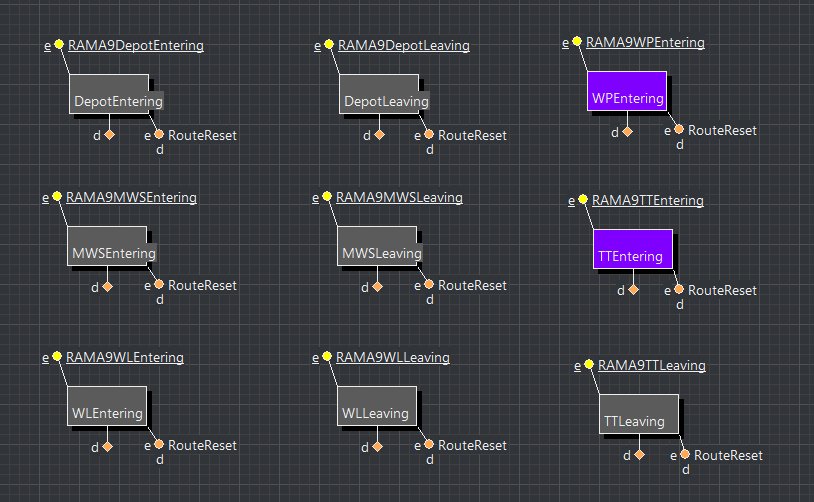
These depot procedures may include the use of sidings allowing reversing. Unfortunately, the path finder is not tailored for such routing. Luckily, the procedure is documented and fixed. Driver must follow a trip as the rail switches are set by the switch controller upfront.
vsTASKER uses one logic per depot exercise and activates the path finder between each stage of the route. When the stopover is reached, the next stage is built. If the driver does not stop or reverse, then the logic is quit and the exercise fails.
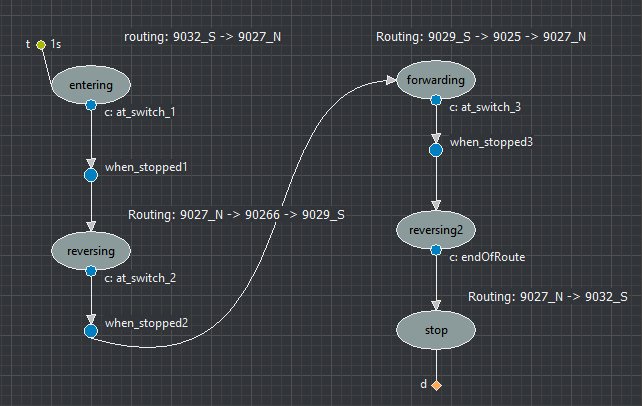
With this approach, the logic builds the route by sections, from the parking position up to the next reverse position, then, once reached, from the train position to the final destination or another reverse position, etc. The section is given to the RailDynamic component which moves each cars along the extracted segments.
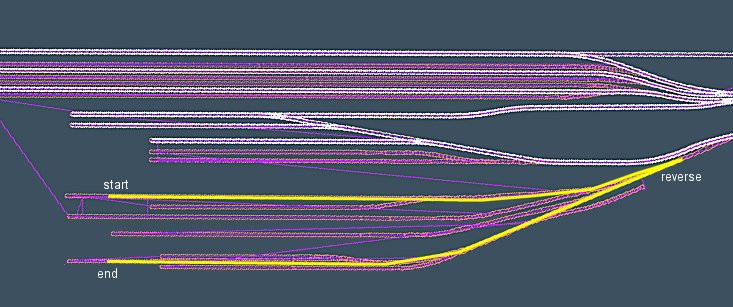
The following video shows in fast motion a depot route procedure to go from a parking position to the car wash station.
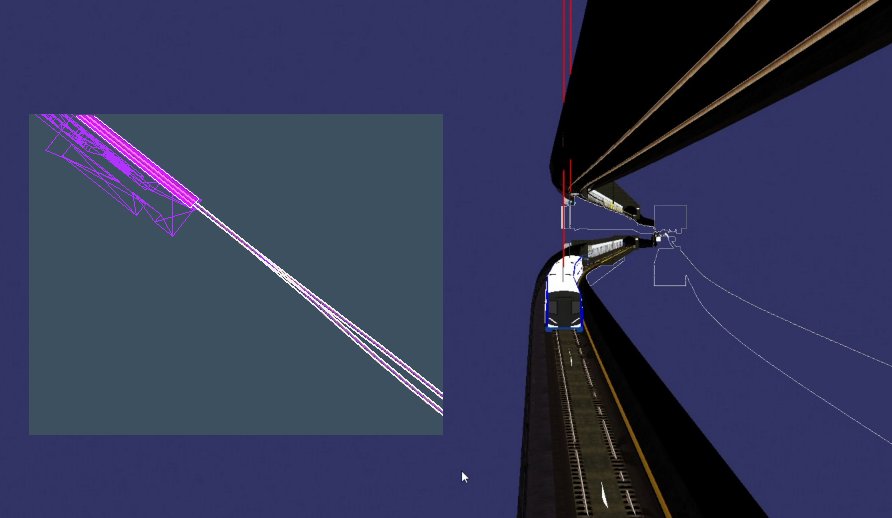
Failed Train Rescue
The simulator provides an exercise to the driver to go fetch a failed train on the service line. Instructor can position it anywhere on the two service lines, using an offset distance (from the line start or from a station center, positive or negative).
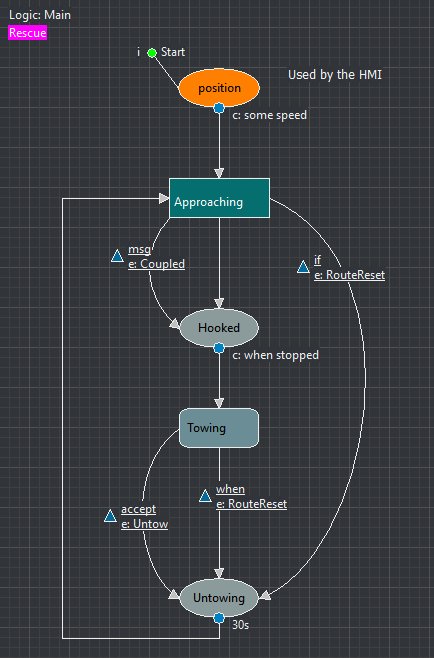
The rescue train starts from a depot parking track, rides until it hooks the failed train, then pull it back to the repair depot station.
vsTASKER implements the exercise like a depot route procedure. First section from the parking track to the failed train, then another section back to the repair station. In between, a task is constantly checking the speed to accept or reject the hooking.
Performance Analysis
vsTASKER simulation engine runs internally at 60hz. It outputs MQTT topics on the network at 60hz. Cab driver camera position is also provided at 60hz since the IG client runs at this frequency. Note that on vsVIEWER, updates are made at 10hz, with the smoothing feature on, and the result is nicer than on VegaPrime since vsVIEWER runs at 140hz.
The other car positions are updated at 10hz, as only the inside cameras display on CCTV screens located in the cab. The extrapolation formulas are fair enough for both car position and angles.
Conclusion
vsTASKER proved to be a good tool to produce the core simulation system of the metro cab trainer. It could easily and quickly address difficult requirements. The deployed simulation engine remained license free. The use of vsVIEWER (free OSG based IG) allowed remote development and testing without a need of an additional and expensive VegaPrime license.